Jdeisenberg (talk | contribs) (New page: ==Introduction to Binding in JavaFX== JavaFX lets you ''bind'', or link, attributes so that when one attribute changes, all attributes bound to it will automatically change as well. That s...) |
|||
| (17 intermediate revisions by 9 users not shown) | |||
| Line 2: | Line 2: | ||
JavaFX lets you ''bind'', or link, attributes so that when one attribute |
JavaFX lets you ''bind'', or link, attributes so that when one attribute |
||
changes, all attributes bound to it will automatically change as well. That sounds |
changes, all attributes bound to it will automatically change as well. That sounds |
||
| − | rather abstract, but |
+ | rather abstract, but it’s not difficult at all. |
| − | + | Let’s start with a simple program to demonstrate''' binding. As we develop the |
|
| − | program, |
+ | program, we’ll also give''' some advice on programming practices. The program |
| − | displays a frame with a <code>Label</code> and two <code>Button</code>s. |
+ | displays a frame with a '''<code>Label</code> and two <code>Button</code>s. ''' |
It looks like this... |
It looks like this... |
||
[[Image:Bind_tutorial_bind1.png]] |
[[Image:Bind_tutorial_bind1.png]] |
||
| − | ...and |
+ | ...and here’s the code |
<pre> |
<pre> |
||
| Line 19: | Line 19: | ||
width: 300 |
width: 300 |
||
height: 75 |
height: 75 |
||
| − | content: |
+ | content: |
FlowPanel { |
FlowPanel { |
||
content: [ |
content: [ |
||
| Line 33: | Line 33: | ||
] |
] |
||
} |
} |
||
| − | ] |
||
visible: true |
visible: true |
||
}</pre> |
}</pre> |
||
| Line 40: | Line 39: | ||
shown in the label. One approach to solving this problem in a procedure-oriented language might use this pseudo-code: |
shown in the label. One approach to solving this problem in a procedure-oriented language might use this pseudo-code: |
||
| − | * |
+ | *“Listen” for an action on the button |
*Extract the text content from the label |
*Extract the text content from the label |
||
*Convert to an integer |
*Convert to an integer |
||
| Line 48: | Line 47: | ||
===Model/View/Controller=== |
===Model/View/Controller=== |
||
The problem with this approach is that it treats the number as an integral |
The problem with this approach is that it treats the number as an integral |
||
| − | part of the label. |
+ | part of the label. That’s not how we think of it, though. In |
| − | our minds, |
+ | our minds, there’s an abstract counter somewhere (our ''model''), |
and the label is a way to ''view'' its value. The |
and the label is a way to ''view'' its value. The |
||
buttons ''control'' the counter, and any change to its value is |
buttons ''control'' the counter, and any change to its value is |
||
| Line 64: | Line 63: | ||
change the value of an attribute in the model, |
change the value of an attribute in the model, |
||
the view changes automagically; you |
the view changes automagically; you |
||
| − | + | don’t need to write any code to make it happen. |
|
===Construct the Model=== |
===Construct the Model=== |
||
While it is possible to bind the <code>text</code> of the <code>Label</code> |
While it is possible to bind the <code>text</code> of the <code>Label</code> |
||
| − | to a simple variable, the preferred method (again, for |
+ | to a simple variable, the preferred method (again, for flexibility and |
| − | extensibility) is to create a class for the model. |
+ | extensibility) is to create a class for the model. Here’s the |
additional code to create a <code>Counter</code> class and initialize |
additional code to create a <code>Counter</code> class and initialize |
||
| + | an instance of it. Go ahead and place this code after the import statement but before the <code>Frame</code>: |
||
| − | an instance of it: |
||
<pre>class Counter { |
<pre>class Counter { |
||
| Line 79: | Line 78: | ||
attribute Counter.value = 0; // initial value for new instances |
attribute Counter.value = 0; // initial value for new instances |
||
| − | var count:Counter = new Counter( |
+ | var count:Counter = new Counter();</pre> |
===Bind the Model to the View=== |
===Bind the Model to the View=== |
||
| Line 85: | Line 84: | ||
<pre>Label { |
<pre>Label { |
||
| − | text: |
+ | text: bind count.value.toString( ) |
}</pre> |
}</pre> |
||
| − | We |
+ | We can’t say <code>text: bind count.value</code> |
because <code>count.value</code> is an <code>Integer</code>, |
because <code>count.value</code> is an <code>Integer</code>, |
||
and a <code>Label</code> |
and a <code>Label</code> |
||
requires its <code>text</code> attribute to be a <code>String</code>. |
requires its <code>text</code> attribute to be a <code>String</code>. |
||
| − | + | That’s the bad news. The good news is that this example shows that |
|
JavaFX lets you bind an attribute to an <em>expression</em>, not just to a |
JavaFX lets you bind an attribute to an <em>expression</em>, not just to a |
||
variable. |
variable. |
||
| Line 99: | Line 98: | ||
Finally, add an <code>action</code> to each <code>Button</code> so that |
Finally, add an <code>action</code> to each <code>Button</code> so that |
||
it can control the model. |
it can control the model. |
||
| − | (See the entire file.) |
+ | ([[Introduction to Binding: Example 2|See the entire file.]]) |
<pre>Button { |
<pre>Button { |
||
text: "Add 1" |
text: "Add 1" |
||
action: operation( ) { |
action: operation( ) { |
||
| − | count.value+ |
+ | count.value = count.value + 1; |
} |
} |
||
}, |
}, |
||
| Line 110: | Line 109: | ||
text: "Subtract 1" |
text: "Subtract 1" |
||
action: operation( ) { |
action: operation( ) { |
||
| − | count.value- |
+ | count.value = count.value - 1; |
} |
} |
||
}</pre> |
}</pre> |
||
| Line 117: | Line 116: | ||
We wrote the <code>action</code> attributes the way we did in order |
We wrote the <code>action</code> attributes the way we did in order |
||
to get the program up and running quickly, so that you could have a |
to get the program up and running quickly, so that you could have a |
||
| − | + | successful experience as soon as possible. While the program certainly |
|
| − | works, the code |
+ | works, the code isn’t organized well. Consider that our original |
problem was to separate the model and the view. Our code is |
problem was to separate the model and the view. Our code is |
||
merging model and view by making the <code>Button</code> know how much to |
merging model and view by making the <code>Button</code> know how much to |
||
| − | increase or decrease the |
+ | increase or decrease the counter’s value. That code properly |
belongs in the <code>Counter</code> class, which we rewrite as follows: |
belongs in the <code>Counter</code> class, which we rewrite as follows: |
||
| Line 140: | Line 139: | ||
}</pre> |
}</pre> |
||
| + | Go ahead and place this code after the |
||
| − | Each of the buttons is rewritten to call the appropriate <code>operation</code>. |
||
| + | <p><code>import javafx.ui.*;</code><br />statement but before the<br /><code>var count:Counter = new Counter();</code> statement</p>Each of the buttons is rewritten to call the appropriate <code>operation</code>. |
||
| − | (See the entire file.) |
||
| + | ([[Introduction to Binding: Example 3|See the entire file.]]) |
||
<pre>Button { |
<pre>Button { |
||
| Line 156: | Line 156: | ||
}</pre> |
}</pre> |
||
| + | ===Multiple Binding=== |
||
| − | '''more to come...''' |
||
| + | We wrap up this introduction by showing that you can have more than |
||
| + | one item bound to a particular atttribute. We will change our example so |
||
| + | that, as all good accountants know, negative numbers are displayed in red |
||
| + | and non-negative numbers in black. This requires binding the color of the <code>Label</code> |
||
| + | to the value of the counter. Here’s the additional code for the |
||
| + | <code>Label</code>. |
||
| + | ([[Introduction to Binding: Example 4|See the entire file.]]) |
||
| + | |||
| + | <pre>Label { |
||
| + | text: bind count.value.toString( ), |
||
| + | foreground: bind |
||
| + | if (count.value >= 0) then |
||
| + | black:Color |
||
| + | else |
||
| + | red:Color |
||
| + | }</pre> |
||
| + | |||
| + | '''Important!''' That’s an <code>if</code> expression, ''not'' |
||
| + | an <code>if</code> statement. Use the keywords <code>then</code> and |
||
| + | <code>else</code>, and do not use curly braces. |
||
| + | |||
| + | You might wonder why we put this code directly on the <code>Label</code> |
||
| + | rather than making it an <code>operation</code> in the <code>Counter</code> |
||
| + | class. The reason is that we always want to keep the model and view |
||
| + | separate. The counter knows how to add and subtract, but has no idea |
||
| + | what color it should be; that’s the job of the <code>Label</code>. |
||
| + | |||
| + | |||
| + | |||
| + | orm of a class) to hold the information that will change, then |
||
| + | bind the class’s attributes to the view. |
||
| + | [[Category:gggg]] |
||
Latest revision as of 08:27, 28 February 2012
Introduction to Binding in JavaFX
JavaFX lets you bind, or link, attributes so that when one attribute
changes, all attributes bound to it will automatically change as well. That sounds
rather abstract, but it’s not difficult at all.
Let’s start with a simple program to demonstrate binding. As we develop the
program, we’ll also give some advice on programming practices. The program
displays a frame with a Label and two Buttons.
It looks like this...
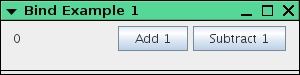
...and here’s the code
import javafx.ui.*;

Frame {
    title: "Bind Example 1"
    width: 300
    height: 75
    content:
        FlowPanel {
            content: [
                Label {
                    text: "0"
                },
                Button {
                    text: "Add 1"
                },
                Button {
                    text: "Subtract 1"
                }
            ]
        }
    visible: true
}
The object of this program is to activate the buttons to add or subtract 1 from the number shown in the label. One approach to solving this problem in a procedure-oriented language might use this pseudo-code:
- “Listen” for an action on the button
- Extract the text content from the label
- Convert to an integer
- Add (or subtract) one
- Convert the value to a string and put that back into the label
Model/View/Controller
The problem with this approach is that it treats the number as an integral part of the label. That’s not how we think of it, though. In our minds, there’s an abstract counter somewhere (our model), and the label is a way to view its value. The buttons control the counter, and any change to its value is reflected in the view through the label.
This is a much more flexible approach to the problem. Instead of a
Label, we could view the counter as a
Slider or Spinner or even as some custom
GUI component.
JavaFX is perfectly suited to the Model/View/Controller architecture, because it lets you bind an attribute of the model to the view. As soon as you change the value of an attribute in the model, the view changes automagically; you don’t need to write any code to make it happen.
Construct the Model
While it is possible to bind the text of the Label
to a simple variable, the preferred method (again, for flexibility and
extensibility) is to create a class for the model. Here’s the
additional code to create a Counter class and initialize
an instance of it. Go ahead and place this code after the import statement but before the Frame:
class Counter {
    attribute value: Integer;
}

attribute Counter.value = 0; // initial value for new instances

var count:Counter = new Counter();
Bind the Model to the View
The change to the Label looks like this:
Label {
    text: bind count.value.toString( )
}
We can’t say text: bind count.value
because count.value is an Integer,
and a Label
requires its text attribute to be a String.
That’s the bad news. The good news is that this example shows that
JavaFX lets you bind an attribute to an expression, not just to a
variable.
Add the Controller
Finally, add an action to each Button so that
it can control the model.
(See the entire file.)
Button {
    text: "Add 1"
    action: operation( ) {
        count.value = count.value + 1;
    }
},
Button {
    text: "Subtract 1"
    action: operation( ) {
        count.value = count.value - 1;
    }
}
Improving the Code
We wrote the action attributes the way we did in order
to get the program up and running quickly, so that you could have a
successful experience as soon as possible. While the program certainly
works, the code isn’t organized well. Consider that our original
problem was to separate the model and the view. Our code is
merging model and view by making the Button know how much to
increase or decrease the counter’s value. That code properly
belongs in the Counter class, which we rewrite as follows:
class Counter {
    attribute value: Integer;
    operation increase( );
    operation decrease( );
}

attribute Counter.value = 0;

operation Counter.increase( ) {
    value++;
}

operation Counter.decrease( ) {
    value--;
}
Go ahead and place this code after the
import javafx.ui.*;
statement but before thevar count:Counter = new Counter(); statement
Each of the buttons is rewritten to call the appropriate operation.
Button {
    text: "Add 1"
    action: operation( ) {
        count.increase( );
    }
},
Button {
    text: "Subtract 1"
    action: operation( ) {
        count.decrease( );
    }
}
Multiple Binding
We wrap up this introduction by showing that you can have more than
one item bound to a particular atttribute. We will change our example so
that, as all good accountants know, negative numbers are displayed in red
and non-negative numbers in black. This requires binding the color of the Label
to the value of the counter. Here’s the additional code for the
Label.
(See the entire file.)
Label {
    text: bind count.value.toString( ),
    foreground: bind
        if (count.value >= 0) then
            black:Color
        else
            red:Color
    }
Important! That’s an if expression, not
an if statement. Use the keywords then and
else, and do not use curly braces.
You might wonder why we put this code directly on the Label
rather than making it an operation in the Counter
class. The reason is that we always want to keep the model and view
separate. The counter knows how to add and subtract, but has no idea
what color it should be; that’s the job of the Label.
orm of a class) to hold the information that will change, then bind the class’s attributes to the view.